Daze - Setting up Genesis eNews Extended (Newsletter/Opt-in)
This tutorial is going to show you how to integrate your forms with the Genesis eNews Extended plugin.
You don't need to use this plugin if you don't want to! You can simply copy and paste the forms you made. Follow this tutorial if you'd rather do that instead.
The subscription/newsletter/opt-in areas you see in the WordPress theme demos all use a plugin called Genesis eNews Extended. Genesis eNews Extended will allow us to integrate our forms from our email marketing service and collect subscribers.
Table of Contents:
// Getting Started
// Set up eNews Extended with Flodesk
// Set up eNews Extended with Mailchimp
// DAZE - Displaying the eNews Extended widget on a page
Getting Started
"Why would I use this plugin when I could just copy/paste my subscription form codes?"
You can do this!! The tutorial for that can be found right here.
But sometimes using the Genesis eNews Extended plugin is preferable to pasting opt-in code from your email marketing provider because it will be styled to match your theme! Your Hearten Made theme will always match Genesis eNews.
If you don't have an email marketing service and you're interested in starting one, I recommend these two –– Flodesk & Mailchimp. The tutorials below will show you how to integrate Mailchimp and Flodesk with eNews.
IMPORTANT NOTE: Genesis eNews Extended can be set up with just about every email marketing service (Mailchimp, Flodesk, ConvertKit, Active Campaign, and many many others). And because of this very reason, I just cannot create a tutorial for every single one of them. So if you use a different email marketing service than any of these below, you will need to do a quick search in Google: Genesis eNews and [insert whatever email marketing service you use]. There will definitely be a tutorial out there that will help you connect your service with eNews!
About Flodesk
Flodesk is my new fav. It’s insanely user friendly and comes with aesthetically pleasing templates that are on-brand and super easy to customize. Sending out newsletters and collecting subscribers has never been so easy. They also have gorgeous and mobile friendly pop-up forms you can use on your site as well. I recently made the switch from Mailchimp to Flodesk because of these very reasons + more. Get 50% off your Flodesk plan here. Still not sure? They have a free trial!
About Mailchimp
Mailchimp comes with tons of nice features too, but I’ve found that it’s a little more difficult and time consuming to create & design my email templates. One of the nice things about Mailchimp is that they have a free plan until you hit 2000 subscribers!
Set up Genesis eNews Extended with Flodesk
This tutorial is only for integrating Flodesk ( < get 50% off with that link. boom.) with Genesis eNews Extended if you want your sign up form to match your Hearten Made theme. Flodesk has TONS of other templates + options, and ways to add forms to your website though! Like pop up forms!
- Create an account with Flodesk ( did you click it yet? did I mention 50% off? ) if you haven’t already, and then confirm your email address by clicking the link in the confirmation email they sent you to activate your account.
- Go to the Flodesk homepage and go to Audience > Segments at the top.
- Click “+ Add segment” and then name your new Segment. I’m naming my segment “Subscribers”. You’ll see your new Segment appear below

- Now click on Forms at the top and click the “+ Create New” button to create your form
- In the next window, click Inline on the left side and then choose the first ribbon banner form
- You’ll now be prompted to choose your segment. From the dropdown, choose the segment you made from Step 3.

- After saving, you should now be in the Design tab. Just click Next at the top because we only want to collect subscribers and not design it – The design of this template will end up automatically matching your Hearten Made theme because later we’re going to add the codes to Genesis eNews!
- Now you should be in the Customize tab. You’ll be asked a few questions- like if you want subscribers to double opt-in, receive notifications when people sign up, etc. Choose your answers and keep clicking the Continue button at the top until you get to the Embed tab.
- In the Embed tab, you will get two code snippets. You will only need to add the Header code to your WordPress website so that your subscribers can sign up.
**If you don't already have a Header and Footer Scripts plugin, you will need to download and install this plugin to insert your header code.

- Open a new browser window and go to your WordPress dashboard > Header and Footer Scripts
- In the Header Script area, paste the Flodesk HEADER code (NOT the inline code) and save.
- Go back to Flodesk, and click Advanced Options > then click Get Genesis eNews Snippets. These snippets are what you’re going to add to your eNews widget in the next steps, so keep this window open so you can copy and paste these into the widget!
- Go back to your WordPress dashboard again and go to Appearance > Customize > Widgets. If you haven’t done so already, add a Genesis eNews Extended widget to the widget area where you want the form to display. Copy the snippets from Step 11 and paste them into the eNews widget. DON’T FORGET to add the Hidden Fields to the widget, or your sign-up won’t work.
Note: if you only want to collect First Name & Email Addresses, leave the Last Name field blank!

- The important part is adding those fields to the widget, but feel free to customize everything else how you want– like the title, Text to Show Before form, input fields, button text, etc.
- Now it’s time to test out your newsletter!! Go to your website or blog and Subscribe to your newsletter to see if it works! Go back to Flodesk > Audience > Subscribers to see if you’re on the list. If you are, you know it works!


You can repeat this process to add different sign-up forms to your website and collect subscribers. You can add multiple eNews widgets to your site! For example, maybe you want to add a form on the homepage for new subscribers that gives them a 10% off coupon. And then maybe you want to have a form in the sidebar where people can subscribe to receive updates on your blog.
Set up Genesis eNews with Mailchimp
01. Sign up for a Free Mailchimp Account
The first thing you need to do is create a Mailchimp account. It’s free to sign up, so head on over here to create your account. Once you’ve entered your details and hit Get Started, you will get an email at the email address you provided and you’ll need to Activate your Account through that email.
Once you’ve activated your account it will take you through a series of questions to complete your account creation.
02. Set up an Audience
When you create your Mailchimp account, they will use your setup details to automatically generate an audience for you. You can edit the default information for your audience if you need to, or immediately start adding contacts.
03. Grab your Form Embed Code
Now we need to capture the code needed to set up the Genesis eNews widget. In the Audience section, click on Manage Audience on the right. From the drop-down, select Signup Forms. A new window will open where you need to select the Embedded Forms option. Once you’re there, choose the Unstyled form option.
Now you’ll see the code that you need in the bottom right of the screen.

Copy the entire code and paste it into Notepad (if you’re on a PC), or Notes/TextEdit (if using a Mac). Look through the code and find the section that looks like this (it’s towards the top):

The pink highlighted part of the code is what you need to copy, and we’ll paste this into the eNews widget in the next steps. Remember that the form code is unique, and will look slightly different than mine.
04. Sync your List with Genesis Enews Plugin
Make sure you’ve installed and activated the Genesis eNews Extended Plugin. Head to Appearance > Widgets and look for the “Genesis – Enews Extended” widget on the left side. Drag this widget into whichever widget area you are wanting to place your newsletter sign-up form.
Paste the link you copied from the code from Step 3 under Form Action. In all CAPS, write EMAIL in the e-mail field, FNAME in the First Name Field, and LNAME in the Last Name Field.
Here’s what my eNews widget setup looks like:

Make sure that the link is preceded with https: and that there are no quotations at the beginning or end of the link.
Save your widget!
05. Test it out!
Visit your site and do a test on your signup form to make sure everything is working correctly! If something isn’t working, see the steps above again.
DAZE - Displaying the eNews Extended widget on a page
If you want to display the eNews widget on a page and not just in the sidebar or another widget area, here is the tutorial:
- Head to Appearance > Widgets and add your Genesis eNews Extended widget to the Block Newsletter widget area

- Configure the widget by following one of the tutorials above if using Flodesk or Mailchimp, or the tutorial you found online if using another email marketing service. Save the widget when you're finished.
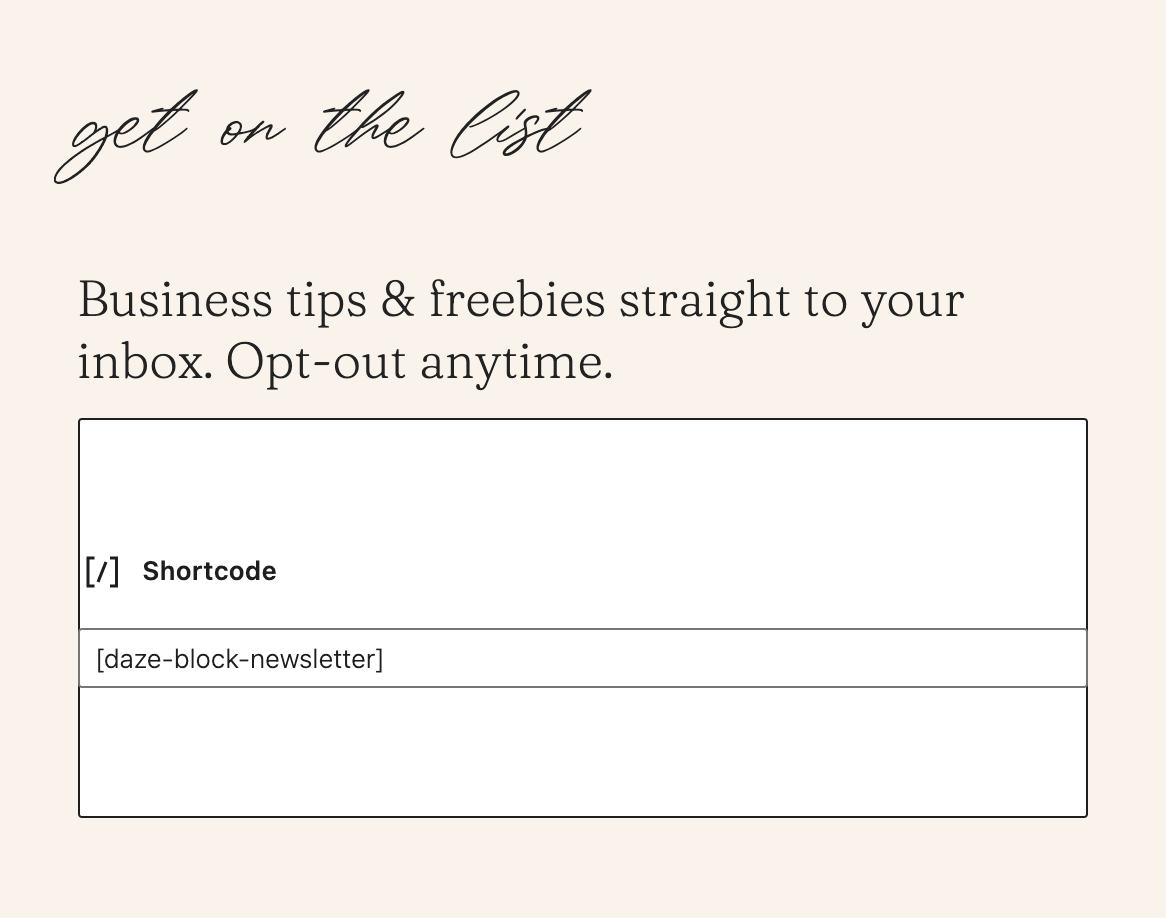
- Now go to the page where you want to display the form.
- Add a Shortcode block to the page and paste in this shortcode:
[daze-block-newsletter] - Now save the page, view the page, and you should see your form